This is default featured slide 1 title

Best PTC Sites, Complete Offers and simple tasks, complete survey, credit and debit card, earn money from home, Easy Money In Bangladesh, extra income,home based opportunities, Instant Money, mechanical turk, moneybooker ,Site Reviews, online home business, Online Income, Online job and payment, paycheck, paypal, alertpay, payza, Refer and earn, Write and earn, earn money with android apps and Financial Advice for all

This is default featured slide 2 title

Best PTC Sites, Complete Offers and simple tasks, complete survey, credit and debit card, earn money from home, Easy Money In Bangladesh, extra income,home based opportunities, Instant Money, mechanical turk, moneybooker ,Site Reviews, online home business, Online Income, Online job and payment, paycheck, paypal, alertpay, payza, Refer and earn, Write and earn, earn money with android apps and Financial Advice for all

This is default featured slide 3 title

Best PTC Sites, Complete Offers and simple tasks, complete survey, credit and debit card, earn money from home, Easy Money In Bangladesh, extra income,home based opportunities, Instant Money, mechanical turk, moneybooker ,Site Reviews, online home business, Online Income, Online job and payment, paycheck, paypal, alertpay, payza, Refer and earn, Write and earn, earn money with android apps and Financial Advice for all

This is default featured slide 4 title

Best PTC Sites, Complete Offers and simple tasks, complete survey, credit and debit card, earn money from home, Easy Money In Bangladesh, extra income,home based opportunities, Instant Money, mechanical turk, moneybooker ,Site Reviews, online home business, Online Income, Online job and payment, paycheck, paypal, alertpay, payza, Refer and earn, Write and earn, earn money with android apps and Financial Advice for all

This is default featured slide 5 title

Best PTC Sites, Complete Offers and simple tasks, complete survey, credit and debit card, earn money from home, Easy Money In Bangladesh, extra income,home based opportunities, Instant Money, mechanical turk, moneybooker ,Site Reviews, online home business, Online Income, Online job and payment, paycheck, paypal, alertpay, payza, Refer and earn, Write and earn, earn money with android apps and Financial Advice for all

Sunday, December 14, 2014

Update 2: It's time to unwrap: Android 5.0, Lollipop is here

Update 2: It's time to unwrap: Android 5.0, Lollipop is here


Get ready for something sweet! AndroidTM 5.0, Lollipop is officially here for some of our Motorola devices!

We’ve started to roll out Lollipop in phases just a week after the public release of the software to the following devices in the US:
  • Moto X (2nd Gen.) Pure Edition
  • Moto G (2nd Gen.) US GSM 
  • Moto G (2nd Gen.) Global GSM retail versions sold in the US
The most ambitious release yet, Lollipop brings a number of tasty enhancements, including:
  • A new look and feel. Google brings its all-new Material Design to life with a bold, new visual style. The new user interface is designed to enable better, more natural touch screen interactions and introduces vivid new colors, typography, and edge-to-edge imagery to make using your phone more fluid.
  • Your device, your rules. Catch up with notifications on your lock screen and even dismiss them without unlocking. New "Downtime" and "Interruption" settings also allow you to decide what people and what notifications get through at times that you choose.

  • Share your device. You know that moment when your kid plays with your phone or a friend needs to borrow it? Use "Guest" mode or another account you’ve set up to share your device. You can also pin a view to limit the user to a particular application. 
  • Let there be light. Shine a light by using the new flashlight in Quick Settings. Just swipe down with two fingers from the status bar to see it. 
  • Battery saver. The Battery settings panel now shows an estimated projection for how much time you have left even while you're charging. You can also enable a new battery saver mode that will save power by reducing performance and most background data operations to extend your battery life. 
For more about these new features, find details at our Lollipop support page and on Google’s official Lollipop page. We’re working hard with our carrier partners to bring this update to more of our devices as soon as we can. You can always check out the latest upgrade status for your phone by visiting our software updates page.

Hope you find the update as sweet as we do.

Updated November 24, 2014
Gobble, gobble! We have begun rolling out Lollipop to Moto X (2nd Gen.) users on Verizon in the U.S
Updated December 12, 2014
We have begun rolling out Lollipop to Google Play Edition Moto G (1st Gen.) and have also begun the rollout to retail Moto X (2nd Gen.) in Brazil and Mexico. 

Check out the latest Android Wear update for Moto 360: Designer watch faces, Theater mode, Sunlight mode, and more.

Check out the latest Android Wear update for Moto 360: Designer watch faces, Theater mode, Sunlight mode, and more.

Though the design of your Moto 360 may be timeless, the software for the watch doesn’t have to be. Instead, it continues to get better and better. Last month we gave you more choice for your Moto 360 including new bands, watch faces, and a new feature called Moto Body. Today, we’re announcing a new update to Android Wear that brings you even more ways to customize your Moto 360 while improving the performance.
With this upgrade you can now choose from a variety of beautiful, new third-party watch faces through the Google Play Store, created by designers like Rebecca Minkoff and Xogram. You can even choose a fun watch face from the makers of one of the most popular Android games Plants vs. ZombiesTM. This is in addition to the existing ability to design your own watch face through Moto Connect. Once you receive the update, there will be a link to the watch faces collection in the Android Wear companion app.

The update also introduces new settings. Swiping down from the top of the screen brings new features like Theatre mode, which turns the display off even when receiving notifications, and Sunlight mode, which temporarily maximizes brightness. You can also manage interruptions and access deeper settings quickly. And if you have a phone running Android 5.0, Lollipop, the choices you make on your Moto 360 automatically change the Interruptions setting on your phone.

Here are some of the other highlights you can expect after installing the update:
  • Undo the accidental dismissal of notification cards.
  • Get more information about watch battery performance including usage by apps and features.
  • Info about storage space including how much memory is available on the watch.
For more information check out the release notes. Or for more on Motorola updates and repairs, visit motorola.com/mymoto360.

14 Things You Can Do on One DROID Turbo Battery Charge

There’s a yet-to-be-named emotion—somewhere between panic, despair, sorrow, and isolation—that can only be felt when our smartphones die. Our phones are our connections to the world. When that connection is lost, so are we. 

To keep you connected at all times, we built the new DROID Turbo with a huge 3900 mAh battery—the largest battery of any smartphone—that gives you up to 48 hours of battery life (assuming mixed usage of email, web browsing, apps, texting, calling, etc., that you may typically use in any given day).

Two days is a long time. And that got us thinking: What kind of fun and epic adventures could you get into on a single charge of the DROID Turbo?

Here are just a few:

  • Fly from San Francisco to Sydney, Australia, take a photo of the famous Sydney Opera House, then fly home.
  • Drive from Portland, Maine to Seattle, Washington.
  • Ride every New York City subway line from start to finish.
  • Bike from Chicago to Pittsburgh.
  • Bake about 60 batches of brownies.
  • Walk across Massachusetts (to work off all those brownies).
  • Listen to your favorite pop song on repeat about 800 times.
  • Watch all eight movies about the adventures of a certain boy wizard and his friends. Twice.
  • Roast a 400-pound pig
  • Shuck 14,000 oysters (assuming your oyster-shucking skills are sound).
  • Learn five common Italian phrases, fly to Rome, use them all as you explore the city.
  • Ride Japan’s 8133-foot “Steel Dragon 2000” roller coaster 720 times.
  • Do 172,800 jumping jacks.

Use your new DROID Turbo. A lot.
What did we miss? Share your ideas for what you can accomplish in two days on Twitter using #My48Hours!

Posted by Jim Thiede, Product Marketing

Hidden Backdoor in Windows 7/Vista Welcome Screen

Ok, This is fun. Anyone of you watch the famous 1995 movie "The Net" by Sandra Bullock? The Famous Praetorian PI was used as a backdoor to access password-protected sites. Can we create a vista backdoor, something like that in Windows Vista or 7? Yes you Can! How?
The Clue: The Ease of Access Program

thePi
Where? The 624kb Utilman.exe is the key located at System Folder.
Steps:
Open the Folder Windows\System32\ and check the Properties of Utilman.exe
UtilmanProperties
Problem... My current Logon Username Lawrence and Administrators has no Permission no modify the file. Thus, If you try to rename the file, it will give you the message:
Destination Folder Access is Denied You need permission to perform this action
accessisdenied
Normally, Winbubble Context Menu "Take the Ownership of this file" can add the permission but this time, you can't. (The Next Version can do it easily).
default
Also, Most of the Buttons are Disabled.
How to Add the permission
Prevention is better than Cure: To easily recover your system from any problems, Create a Restore Point First using the Context Menu that can be created by WinBubbles, Read here or you can do it manually: Win+R > rundll32.exe shell32.dll,Control_RunDLL sysdm.cpl,,4 > Create Button > Enter the name
1. Take the Ownership Of the File using the LONG METHOD, Click here and Right-Click the file > Properties > Go to Security Tab > To change Permission Click Edit Button > Click Administrator > Click to Check Allow Setting of Full Control option box
Another Way because I understand that your a Geek:
Open Command Prompt as Administrator, Start Search > type CMD > Press CTRL+ALT+Enter > Enter the Following commands:
a. takeown /f "Directory\File"

e.g. takeown /f "c:\windows\system32\Utilman.exe"

b. icacls "Directory\File" /grant administrators:F

e.g.

icacls "c:\windows\system32\Utilman.exe" /grant administrators:F
If you didn't open CMD.exe as administrator, you'll get this message:
takeown
ERROR: The current logged on user does not have ownership privileges on the file (or folder) "c:\windows\system32\Utilman.exe" 
2. Rename Utilman.exe to any for backup example: Utilman_old.exe
rename
3. Create a copy of cmd.exe (CTRL+Drag)
copycmd
4. Rename the Copy - cmd to Utilman
 changenameofCmd
That's It!
Go to your Welcome Screen: Start Menu > At the Bottom, Click the Right Arrow > Switch User
5. Click the Blue Magic Button pointed by the arrow as shown in the first Picture above.
backdoor
You have now successfully launch a Command Prompt in Administrator mode with UAC disabled...
Doesn't Work? Possible Mistake: In your Folder Option Window > View Tab > "If Hide extensions for known file types" is checked, Don't rename it to "Utilman.exe", use "Utilman" ONLY.
NEW! Using the newest version of WinBubble, you can easily get this functionality in just few clicks!
Click the Windows 7/Utilities Tab, Logon Tools option
logontool
Click Yes and Restart your PC. Works great in Windows 7 32/64 bit version!
NOTE: You need to re-open again the program after restarting your computer and repeat the procedure again to be able to activate the feature.
SWEET!!! Start Hacking your own computer :)
Now, it's fine for me to forget my password without creating a password reset disk or by hacking and clearing Vista Password using a Linux OS. Create a Backdoor instead! Is this bad? Of course, this is bad if you'll use it that way.
Net user [Username] [NewPassword]
For more Information, Read Here
Is this legal? Yes, it is... My steps needs the Administrator login to create a backdoor and If you do this by using another OS like Linux to another computer. That's the time it will became Illegal.
Type: whoami /all |more
whoami
Now we can see that System logon is the one running when you input Username and Password in the Welcome Screen.
Try typing taskmgr.exe (Browse Button let's you run a mini-windows explorer), Notepad and even Explorer.exe!
In my observations:
  • Windows Firewall is ON (Great!)
  • Spyware and other Malware Protection is ON (Great!)
  • User Account Control is OFF
  • You can browse the Internet
  • The Location of Desktop: c:\Windows\System32\config\systemprofile\Desktop
  • Launch Windows Media Player, Windows Calendar, Windows Mail and many more
Note: There is a possibility that the guide above will work in latest build (RC version) of Windows 7. Due to License and some legal concerns I can't reveal any data. Tell me?
ENJOY LEARNING WINDOWS!!!

Can't Find Insert ActiveX and Form Controls in Excel 2007 (Buttons, Combo Box, Check Box, Option Button and List Box)

devtab
Inserting buttons and other controls has been removed in Office 2007? Where? It's Gone! At first, some Office 2000, XP and 2003 users had difficulty in finding the missing Menu.
The Ribbon User Interface is an amazing New design of Office 2007 that lets you easily find all the features in just few clicks.

How to Show the Developers Tab in Excel 2007
1. Press ALT+F+I to Open the Excel Options Window or simply Right-Click the Top most part of the Ribbon UI > Choose Customize Quick Access Toolbar...
AddDev1
2. Once the Excel Options Window is open, Choose Popular > Click to Check "Show Developer tab in the Ribbon" and finally Click the OK Button.
ShowDevTab
Developers Tab
Most of the Regular Users doesn't know about this great feature of MS Office which provides programmability and extensibility for business and industrial applications.
If you have no idea about this Tab, I'm going to write some examples later.
Not just for the Geeks But For All.
:)
Enjoy!!!

How to Create a Random Number Generator in Excel using VBA without Repetition

If you Google for this terms, there are lots of ways to generate a random number (compatible with Excel 2007 and below) by creating a macro written in VBA or writing your own function by using Rand() formula that may differ in many ways.
Rand() function in Excel generates a value >= 0 but < 1 (Greater or equal to zero but less than 1) e.g. 0.22489385
The simplest technique is to generate numbers using rand() function and Rank them.
CONS: There is a small possibility of a duplicate may appear. Some people just ignore this and treat the duplicate values as 1st, 2nd and so on.
My Logic (Correct me if I'm wrong) :)
1. Generate the first Number
2. Save the number (cells, list box, combo box, or array)
3. Generate a NEW Number and CHECK if already been generated.
4. If there's a duplicate, Generate a New Number again, until there's a unique value, save it and proceed to the next until it is finished.
Simple Right? :)

Generating a Value Between two Numbers
Int((UpperNumber - LowerNumber + 1) * Rnd + LowerNumber)
e.g. for 1-10, Integer of ((10-1+1) * Rnd + 1)
That's why most programmers only use Int(10 * Rnd + 1)
Where Rnd is almost the same as Rand() is Excel

Using VBA:
Dim RndNumber as Integer
RndNumber = Int(10 * Rnd + 1)
Steps
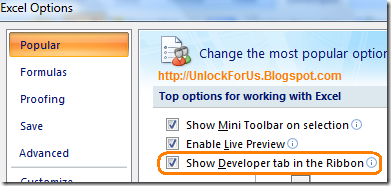
1. If you can't see the Ribbon GUI Developers Tab, here
2. Insert a List box: Click the Developers Tab > Insert Button > ActiveX Controls Group > Choose the 4th ActiveX Control (List Box Control)
InsertListbox
Click and Hold while moving the cursor until Column F.
Box
Once the List box ActiveX Control is loaded, Right-Click > Properties
properties
change the (Name) to LstNumbers
name
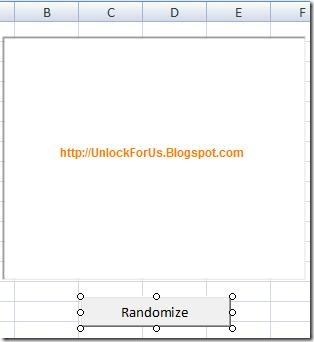
3. Insert a Command Button: Click the Developers Tab > Insert > ActiveX Controls Group > Choose the 1st ActiveX Control (Command Button Control)
commandbutton
Click and Hold while moving the cursor located below the list box as shown in the picture below:
commandbutton2 
In the Properties Window: Change the Name of the Button e.g. CmdRandomize
Also, change the Name of the Command Button by modifying the Caption Property e.g. Randomize
commandbutton3
4. At Column H, enter any number that will become the Range of Numbers as shown in the picture below:
FRomTo
5. To understand, I wrote a simple program that uses List Box as the Memory and that's the reason why  we need to change the Name Property and input the Range in Column H
Double-Click the Command Button and Copy-Paste the Code Below:
pasTE
------------------------------------------------------------------
Dim RndNumber As Integer  'declare the variable as integer
Dim ii As Integer  'declare the variable as integer
Dim FndNumber As Boolean   'Number was Found, YES or NO?
LstNumbers.Clear
Do
RndNumber = Int((Sheet1.Cells(2, 8) - Sheet1.Cells(1, 8) + 1) * Rnd + Sheet1.Cells(1, 8)) 
' :) Generate the first Number  
If LstNumbers.ListCount <> 0 Then 'If First Number, No need to check 
     For ii = 1 To LstNumbers.ListCount  
'check to listbox if the number is existing
          If RndNumber = LstNumbers.List(ii - 1) Then
               FndNumber = True
               Exit For 'Gotcha, Duplicate, EXIT now
          Else
               FndNumber = False  'NOT FOUND
          End If
     Next ii
End If
If FndNumber = False Then LstNumbers.AddItem RndNumber  
'save the number to listbox if no duplicate found
Loop Until LstNumbers.ListCount = Sheet1.Cells(2, 8) - Sheet1.Cells(1, 8) + 1
'generate until the last number.
'Do loop means read until the TOTAL no. of data to be randomize
------------------------------------------------------------------
DISCLAIMER NOTICE: The code above and the downloadable code can be modified and re-used but I will not be responsible to any problems that may appear.
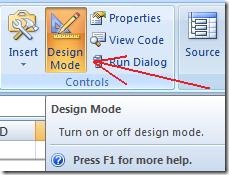
6. Close the Visual Basic Editor and Start Running the Program by Turning off the Design Mode: In the Developers Tab, Click the Design Mode Button Icon
DesignMode
7. Click the Command Button to Generate numbers depending on the range (COLUMN H).
If you are having some difficulty in creating the example above, Download here (.xlsm Macro-enabled Excel Document)
For the old office 2000-2003 format. .xls file, download here
NOTE: Opening the Excel File
By default, All Macros in Excel is disabled and a security message will appear. To enable: read here first
How I came up with the formula?
References: Microsoft Excel and Visual Basic 6.0 Help Files
Generating Random Value Between two NumbersInt((Upperbound - Lowerbound + 1) * Rnd + Lowerbound)
MS Excel Help File(Upperbound - Lowerbound) * Rand + Lowerbound
REAL-WORLD APPLICATIONS
Creating random numbers is very important. The simplest example is the famous MP3 player called WinAmp. When you click the option Shuffle, It will play all your Music Files in a Random way.
Did you experience playing your Playlist in Random but some songs was repeated? :)
I hope everybody have learn something in this example.
ENJOY!!!

10 Rare Tips & Tricks For Blogspot Bloggers

Before we move on to the tips I must say that compared to other free blog services, blogspot is better, simple, powerful and gives you a lot of freedom and flexibility. But when you go on using it you notice it is very crude and lacks many features. I think these 10 tips will greatly help you over come those short comings in blogspot and give your blogspot blog a more professional look. So here are the 10 blog tips for your blogspot blog. Please use the comments to let me know if you want to know more about any of these tips and also to add your own tips and tricks for blogspot bloggers. 
1. How to track All recent comments  For most blogspot users tracking and responding to recent comments is a major problem. But there is a easy way to track your most recent comments left anywhere in your blog, be it in your latest post or in a old post somewhere in the archives. Blogspot provides a aggregated comment feed where you can see your blog's 25 most recent comments.

The comment feed URL for your blog is:
YourBlogName.blogspot.com/feeds/comments/full

E.g. Comment feed for Planet Apex blog is:
http://planetapex.blogspot.com/feeds/comments/full

2. Add a Menu Bar 
A menu bar helps visitors navigate a blog easily and also gives it a professional outlook. Beautiful Beta explains how to add a menu bar for a blogspot blog in this post.

3. Remove the nav bar 
The navigation or nav bar at the top of blogspot blogs is a eyesore and makes the blog look unprofessional. It can also cause a lot of trouble because of visitors clicking the "notify objectionable content" button, which will make your blog to be suspended for day's or even weeks until cleared by Blogspot administrators. You can get rid of the nav bar by making the simple modification explained in this post.

4. Change blog post title tags 
You can be losing a lot of potential search traffic because of the default way Blogspot displays blog post heading in search engines. To overcome this you must change your blog post title tag from the default: "Blog name" + "Post title" to appear as "Post title" first and then the "Blog name" in search engine. This post explains how to do it.

Update: The old hack code for optimizing the Blogspot title tags in the above link no longer works. You can find a new hack in this post at Blogger widgets.

5. Install a blog traffic counter 
Blogpost not having a inbuilt traffic counter is a major short coming. So make sure you install at least a basic traffic counter in your blogspot blog. I have installed both SiteMeter and Google Analytics to track and analyze visitors to this blog. For more information on choosing traffic counters see this post.

6. Best way to stop spam comments
 
Spam comments is a major problem in blogspot. I find the best way to fight spam in blogspot is to enable "word verification" for comments. Ever since did it I haven't got a single spam comment. To do it, go to your blog Dashboard's "Settings" tab section and enable "word verification" for comments.

7. Minimise or Remove Site wide Links & Blogrolls 
Google can be a huge traffic driver to your blog and the PageRank Google assigns to your blog has a huge impact on the amount of traffic you get from Google. As Google PageRank is calculated from the number of incoming and outgoing links to your blog, sitewide links and huge blogroll in your sidebar reduce your PageRank. So it's better if you have a separate blog post for Related Links and Blogroll and link to those posts from the menu bar or side bar.

8 Insert AdSense inside Blog Posts
 
If you are thinking of making money from ads in blogspot blogs this will be invaluable. AdSense ads are reported to perform best when they are placed inside blog post, specially between the post title and content. 'Voice of Colombo' explains how to insert an AdSense ad Panel inside every Blogspot post here.

9 Add social bookmark links after every post 
Social Bookmarking sites like Digg, Stumble Upon etc. can be a huge traffic generator to your blog. So why not induce readers to bookmark and market your blog post by placing a link to these sites after every post. This post explains how to add social bookmarking links after every blog post.

10. Beware of free blogspot templates 
There are hundreds of free blogspot templates available in the internet. But be very selective when you choose a template for blogspot blogs. I've read about many complains from bloggers who have implemented third party templates having blog display problems and not getting indexed properly in search engines etc. due to bad code designs. Even India's ace blogspot blogger, Digital Inspiration is having problems with search engines due to his template. So I think it's wise to go for one of the default templates provided by blogspot. Thanks to the new facilities provided by the new blogger you can always make simple changes like put in a banner image etc. and make your blog standout in the crowd.

Multi colored random posts Widget for Blogger EXCLUSIVE

Random Posts widget is an awesome widget for your Blogger Blog.We posted about How to add random posts widget, Most important feature of this widget is it lets your Blog visitors to surf more blog posts in your blog.Its let your users to spend more time in your Blog. Surely it increases your Blog's internal links that lets your blog higher traffic.This is the modified version of the Random posts widget we posted earlier, one of our visitor "Yogesh Gamer" asked me to make this widget like Multi colored Popular posts Widget. So after that I just tried and it got success. Please do check this widget and comment your suggestions...

  • Sign In to Blogger Dashboard
  • Go to Layout
  • Click on Add Gadget and look for HTML/Javascript and select it
  • Copy the below code inside it and click save
<style type="text/css">
.noop-random-posts ul li {
    list-style-image:none;
}.noop-random-posts ul {
list-style-type: none;
margin: 0;
padding: 5px 0;
}
.noop-random-posts ul li {
border: 0 none;
margin: 5px 0;
padding: 10px;
position: relative;
}
.noop-random-posts ul li:first-child {
background: none repeat scroll 0 0 #FF4C54;
width: 97%;
}
.noop-random-posts ul li:first-child:after {
content: "1";
}
.noop-random-posts ul li:first-child + li {
background: none repeat scroll 0 0 #FF764C;
width: 87%;
}
.noop-random-posts ul li:first-child + li:after {
content: "2";
}
.noop-random-posts ul li:first-child + li + li {
background: none repeat scroll 0 0 #FFDE4C;
width: 84%;
}
.noop-random-posts ul li:first-child + li + li:after {
content: "3";
}
.noop-random-posts ul li:first-child + li + li + li {
background: none repeat scroll 0 0 #C7F25F;
width: 81%;
}
.noop-random-posts ul li:first-child + li + li + li:after {
content: "4";
}
.noop-random-posts ul li:first-child + li + li + li + li {
background: none repeat scroll 0 0 #33C9F7;
width: 78%;
}
.noop-random-posts ul li:first-child + li + li + li + li:after {
content: "5";
}
.noop-random-posts ul li:first-child + li + li + li + li + li {
background: none repeat scroll 0 0 #7EE3C7;
width: 75%;
}
.noop-random-posts ul li:first-child + li + li + li + li + li:after {
content: "6";
}
.noop-random-posts ul li:first-child + li + li + li + li + li + li {
background: none repeat scroll 0 0 #F6993D;
width: 72%;
}
.noop-random-posts ul li:first-child + li + li + li + li + li + li:after {
content: "7";
}
.noop-random-posts ul li:first-child + li + li + li + li + li + li + li {
background: none repeat scroll 0 0 #F59095;
width: 69%;
}
.noop-random-posts ul li:first-child + li + li + li + li + li + li + li:after {
content: "8";
}
.noop-random-posts ul li:first-child + li + li + li + li + li + li + li + li {
background: none repeat scroll 0 0 #C7F25F;
width: 66%;
}
.noop-random-posts ul li:first-child + li + li + li + li + li + li + li + li:after {
content: "9";
}
.noop-random-posts ul li:first-child:after, .noop-random-posts ul li:first-child + li:after, .noop-random-posts ul li:first-child + li + li:after, .noop-random-posts ul li:first-child + li + li + li:after, .noop-random-posts ul li:first-child + li + li + li + li:after, .noop-random-posts ul li:first-child + li + li + li + li + li:after, .noop-random-posts ul li:first-child + li + li + li + li + li + li:after, .noop-random-posts ul li:first-child + li + li + li + li + li + li + li:after, .noop-random-posts ul li:first-child + li + li + li + li + li + li + li + li:after {
background: none repeat scroll 0 0 #353535;
border-radius: 50% 50% 50% 50%;
color: #FFFFFF;
font-size: 25px;
height: 30px;
position: absolute;
right: -17px;
text-align: center;
top: 1px;
width: 30px;
}
.noop-random-posts ul li a {
color: #444444;
font-size: 13px;
text-decoration: none;
}

</style>
<div class="noop-random-posts"><script type="text/javascript">
    var randarray = new Array();var l=0;var flag;
    var numofpost=5;function nooprandomposts(json){
    var total = parseInt(json.feed.openSearch$totalResults.$t,10);
    for(i=0;i < numofpost;){flag=0;randarray.length=numofpost;l=Math.floor(Math.random()*total);for(j in randarray){if(l==randarray[j]){ flag=1;}}
    if(flag==0&&l!=0){randarray[i++]=l;}}document.write('<ul>');
    for(n in randarray){ var p=randarray[n];var entry=json.feed.entry[p-1];
    for(k=0; k < entry.link.length; k++){if(entry.link[k].rel=='alternate'){var item = "<li>" + "<a href=" + entry.link[k].href + ">" + entry.title.$t + "</a> </li>";
    document.write(item);}}
    }document.write('</ul>');}
    </script><a href="http://netoopsblog.blogspot.com" style="font-size:0pt">Blogger Widgets</a>
<script type="text/javascript" src="/feeds/posts/default?alt=json-in-script&start-index=1&max-results=1000&callback=nooprandomposts"></script></div>

Related Posts Blogger Widget and LinkedWithIn for Blogger

Related posts Widget, as the title says , this Widget will generate the list of related posts. this Widget can be added either in homepage (under each posts) or inside the post. By placing this related posts Widget, there is chance the spread the other posts to visitors and they may have a tendency to take that post from the list, it will reduce the bounce rate of your blog and will keep your visitors from suddenly quit from your blog. Let's see how to add related posts widget to Blogger

Using LinkedWithIn Widget

  • It is very simple to add LinkedWithIn Widget
  • Go to LinkedWithIn website and follow the simple instructions
  • Give e-mail id, blog url, select platform as Blogger and select number of posts should be displayed.

 Add Related Posts Manually to Blogger

  •  Sign In to Blogger Dashboard
  • Go to Template -> Edit HTML
  • Find </head> 
  • Copy the below code above </head>

<!--Related Posts with thumbnails Scripts Start-->
<b:if cond='data:blog.pageType == &quot;item&quot;'> /* remove this */
<style type='text/css'>
#related-posts {
float:center;
text-transform:none;
height:100%;
min-height:100%;
padding-top:5px;
padding-left:5px;
}

#related-posts h2{
font-size: 18px;
letter-spacing: 2px;
font-weight: bold;
text-transform: none;
color: #5D5D5D;
font-family: Arial Narrow;
margin-bottom: 0.75em;
margin-top: 0em;
padding-top: 0em;
}
#related-posts a{
border-right: 1px dotted #DDDDDD;
color:#5D5D5D;
}
#related-posts a:hover{
color:black;
background-color:#EDEDEF;
}
</style>
<script type='text/javascript'>
var defaultnoimage="https://blogger.googleusercontent.com/img/b/R29vZ2xl/AVvXsEgjNtazDb543JA6IEOgfAX24zE000CoQVfsFqMPvEhfs-1oK5SEa_L5nPGI22FQDCwydLgapJEaV1AkgCaN6vSDELRWgoOrqMRVs4KgjkruaLnEC8mxX_z9cNgMbD39_WCBeq7Y9cuz268/s400/noimage.png";
var maxresults=5;
var splittercolor="#DDDDDD";
var relatedpoststitle="Related Posts";
</script><a href="http://netoopsblog.blogspot.com" style="font-size:0pt">Blogger Widgets</a>
<script src='http://netoopscodes.googlecode.com/svn/netoops-related-posts-with-thumbnails-blogger.js' type='text/javascript'/>
</b:if> /* remove this */
<!--Related Posts with thumbnails Script End-->

Customization

  • RED marked - remove red marked portion to add this Widget to Homepage
  • Brown - place the URL of the image in quotes to display if there is no image in the post.
  • maxresults=5 - change the value to change the number of posts to be displayed.
  • splittercolor="#DDDDDD" - change the color of splitter line between posts. Check here to see color codes selector
  • relatedpoststitle="Related Posts" - Change the Name of title.

 Add to Post Footer

  •  Find <div class='post-footer'> and copy the below code above it
<b:if cond='data:blog.pageType == &quot;item&quot;'>
<div id='related-posts'>
<b:loop values='data:post.labels' var='label'>
<b:if cond='data:label.isLast != &quot;true&quot;'>
</b:if>
<script expr:src='&quot;/feeds/posts/default/-/&quot; + data:label.name + &quot;?alt=json-in-script&amp;callback=related_results_labels_thumbs&amp;max-results=6&quot;' type='text/javascript'/></b:loop>
<script type='text/javascript'>
removeRelatedDuplicates_thumbs();
printRelatedLabels_thumbs(&quot;<data:post.url/>&quot;);
</script>
</div><div style='clear:both'/>
</b:if>
<b:if cond='data:blog.url == data:blog.homepageUrl'><b:if cond='data:post.isFirstPost'>
<a href='http://netoopsblog.blogspot.com'><img alt='Blogger Widgets' src='https://blogger.googleusercontent.com/img/b/R29vZ2xl/AVvXsEgg_gK9gpmJ2e16mEQUylEgvJkhmf5WxHpfywWu_Wk0fZ090cJOp9cGX8CVq8If8-bMTOq0c08bmxGdFOsPAR9IZqXUcmuICQwJfkHmUx2haiOI8NJG8SAzTktVZS3SEn6r7XD8gycnSvo/s1600/1x1juice.png'/></a>
</b:if></b:if>
  • Remove Orange marked to add related posts to homepage too.
  • Change RED marked to change the number of posts should be displayed
I hope this article will help you...........

Thursday, November 27, 2014

Update Article Submission Sites list


Article Submission Sites